Protein Energy Bites

You can never have too many recipes for Protein Bites! What you have in your pantry at any given moment will  determine which Protein Bite recipe you will  make, right?
The other night, my husband asked if I had any chocolate in the house and rather than handing him a little bowl of chocolate chips, I whipped up a batch of these. Infinitely better for you than that little bowl of choc chips!

http://aysontespli.ca
Protein Energy Bites

1 cup Rolled Oats
1/2 cup Peanut Butter
2 Tablespoons Coconut Oil
1/2 cup Chocolate Chips – mini ones are best but use what you have
1/4 cup Honey
1/4 cup Chia Seeds
1/4 cup Dates, chopped
1/4 cup dried Cranberries
1/4 cup Pecans, chopped
2 Tablespoons Protein Powder
Pinch of Cinnamon

Sesame Seeds or Fine Desiccated Coconut

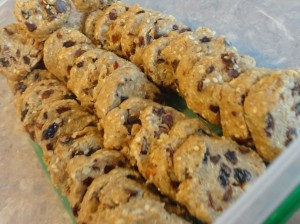
In a large mixing bowl, combine all ingredients except sesame seeds until everything is evenly distributed.
Roll into about 24 balls – I use a #2 Pampered Chef scoop for uniform size
Roll some or all in sesame seeds or coconut.
Refrigerate for at least 30 minutes to set.
Store in an airtight container in the refrigerator for up to a week.

Variation:

www.aysontespli.ca
Protein Energy Bites rolled into a log for slicing instead of rolling into balls.

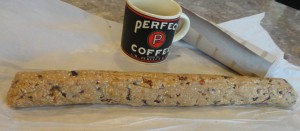
Roll the mixture into a log.
Wrap in parchment paper and refrigerate overnight or for at least 4 hours. ( I slide my wrapped dough into an empty paper towel roll that I slit open for ease of transferring to refrigerator and it helps the dough retain its cylindrical shape)
Slice into 1/4inch slices
Store in airtight container in the fridge for up to a week.

Protein Energy "Cookies" - not so messy on the hands!
Protein Energy “Cookies” – not so messy on the hands!

Yield: 3 Dozen


Cinnamon Roll Bread

All too often I find myself craving Cinnamon Rolls.  I have a few problems with that: all the kids are grown and gone so I would have to eat the entire batch on my own,  they are sinfully good therefore I would find it impossible to eat just one in a single sitting, and finally,  the cream cheese frosting is far too good to be true.

I am always looking for ways to incorporate that yummy Cinnamon Roll taste in a smaller, simpler recipe. I was delighted when this Cinnamon Roll Bread recipe from CenterCutCook came through my Facebook Feed over at Ay Sontespli’s Kitchen! If you love Cinnamon Rolls as much as I do I hope you will be as pleased with this quick bread recipe as I was!

cinnamon roll bread
Cinnamon Roll Bread

2 cups Flour
1 Tablespoon Baking Powder
1/2 teaspoon Salt
1/2 cup Sugar
1 Egg, room temperature, lightly beaten
1 cup Milk ( I often use Almond Milk)
2 teaspoons Vanilla
1/3 cup Greek Yogurt or Sour Cream

Swirl Ingredients
1/3 cup Sugar
2 teaspoons Cinnamon
2 Tablespoons Water

Glaze Ingredients
1/2 cup Icing Sugar
1 Tablespoon Milk

Preheat oven to 350F.
Lightly spray a 9X5 inch Loaf Pan with vegetable oil spray.

In a small bowl combine Swirl Ingredients together: sugar, cinnamon and water; set aside.

In a large mixing bowl combine flour, baking powder, salt and sugar; make a well in the centre.
In a small mixing bowl or a large pyrex measuring cup combine egg, milk, vanilla  and yogurt or sour cream.
Add dry ingredients all at once into the well in the centre of the dry ingredients.
Stir just to combine.
Spoon half of the bread batter into the prepared loaf pan.
Spoon half of the swirl mixture over the batter.
Carefully spoon remaining bread batter over both,  spreading it evenly over the swirl mixture.
Top with remaining swirl mixture, then use a knife to make swirl designs to incorporate the cinnamon swirl into the bread batter.
Bake in preheated oven for 45 – 50 minutes or until a toothpick inserted in centre comes out clean.
Remove bread from oven and place on wire rack to cool.
Run small metal spatula around the edges of the cinnamon bread to loosen from pan; turn out onto wire rack to cool completely.
While bread is cooling, make the Glaze:
Combine icing sugar with scant Tablespoon of milk, adding a little more to achieve desired consistency.
When bread has cooled completely, drizzle glaze over the bread, allow to harden slightly before slicing to serve.
Store in an airtight container for up to 3 days.

Yield: 8 to 10 Slices.

cinnamon roll bread
Cinnamon Roll Bread with a cup of Tea


Caramel Corn

So sometimes you are just craving something sweet but don’t want to feel horribly guilty after consuming said sweet, right? What about Caramel Corn? You convince yourself that Popcorn is good for you….never mind all the sugar and butter required to make it. Caramel Corn, made in your own kitchen is still heaps better than, say, a family size chocolate bar, a bag of chips and perhaps a soft drink, right?
Anyway, everything in moderation, I say. I was actually craving Caramel Corn for ages (since Christmas when I meant to make it but ran out of time) and then along came Valentine’s Day; the perfect excuse to make Caramel Corn to give as a gift while having the opportunity to do a taste test! Perfect, right? Right!

I used to have a great recipe in some random cookbook but I have moved so many times that it is now lost. I turned to my trusty friends over at Canadian Living to find a replacement recipe for Caramel Corn.

caramel corn
Caramel Corn all wrapped up to give away as Valentine’s Day gifts.

8 cups popped Popcorn
3/4 cup packed Brown Sugar
1/3 cup Butter
3 Tablespoons Corn  Syrup
1/4 teaspoon Salt
1/4 teaspoon Baking Soda
1/4 teaspoon Vanilla
2 cups blanched Peanuts

Pop popcorn according to package directions or using your favourite method.
Sift through popped corn and remove any un-popped kernels.

In small saucepan, combine sugar, butter, corn syrup and salt over high heat.
Bring to a boil.
Let cool, stirring, for 2 minutes.
Remove from heat.
Stir in baking soda and vanilla.

Preheat oven to 325F.
Line a large baking sheet with parchment paper; set aside.
In large mixing bowl, toss coating with popcorn.
Transfer to prepared  baking sheet, arranging popcorn in a single layer.
Bake in 325F. oven for 10 – 12 minutes.
Let cool slightly; transfer to mixing bowl and stir in peanuts.
Cool completely.
Divide into a few gift bags,  secure then tie adorn each package with a bit of pretty ribbon and a gift tag.
Or turn out into a storage container with a tight fitting lid; store in a cool, dry location for up to 3 days.

caramel corn
Caramel Corn; the perfect gift for yourself and your friends.

Vanilla

So today I am making some Vanilla. It is going to take ages but I am hoping it will be worth it in the long run. After all, a bottle of spirits and few vanilla pods are far less expensive that a trip to Mexico, right? And I won’t be bothered with sand wedged into numerous spots I would really rather NOT have sand wedged into!

vanilla
Making some Vanilla

I bought these vanilla pods, read  label on the back  that told me to go forth and purchase some spirits. I chose vodka, not sure why but I will try again with bourbon and rum…I am thinking vanilla spiced rum would be to die for!  Not that I DRINK alcohol but  I do so love the smell of Rum…Bundaberg Rum, in particular.  Anyway, I did as the label directed:

Removed Vanilla Pods from bottle,
Split each Pod and returned to bottle
Poured Vodka into bottle to cover Vanilla Pods
Put the cork back on
Now all I have to do is put the bottle in a dark spot, return to it …daily?…to give it a shake,” just for fun”, so the label says.

vanilla
My bottle of Vanilla in the Making ready to go into Hiding

Check back with me in 6 weeks time and I will let you know how the Vanilla turned out.


Carrot Top Pesto

So you are trying to eat healthier, you make the most of each of your produce purchases, right? What about the greens on those fresh carrots you just bought? Did you know you could make yummy pesto out of them? Doesn’t taste all that different from a pesto made with fresh parsley!

I had two bunches of carrots in the fridge, noticed the greens were beginning to look a little less than optimum which meant I needed to use them up fast. I googled, “what to do with carrot greens” and came up with a long list to choose from. I wanted super simple and this recipe from Culinate fit the bill to the T.  I put a pot of water on to boil for some linguini and by the time it was ready, the pesto was done.

Admittedly, I did not know how my husband would respond to this dish. He was raised a super meat eater and I think in his mind,  green stuff is, well, weird. He has come leaps and bounds over the past 15 years but I was thinking that this recipe might be a bit of a stretch. I placed his serving of Carrot Top Pesto and Linguini in front of him, watched his face closely…slight raising of eyebrows,  he asked, “What’s this? It smells very P-cheesy”…took a tentative bite and smiled. (Dear husband is NOT a fan of Parmesan Cheese, but it is a vital ingredient in this recipe, in my opinion) Whew! I didn’t tell him straight away just what it was that he was eating. He is pretty trusting that most everything I cook is pretty delish. After he had really tucked into the meal I told him what it was and he was amazed!

Wow your family tonight with this super easy Carrot Top Pesto and Linguini.

Carrot Top Pesto and Linguini

1 cup (20 grams) lightly packed Carrot Leaves, stems removed, rinsed
6 Tablespoons (90 ml) Extra Virgin Olive Oil
2 cloves Garlic
1/2 teaspoon Salt
*3 Tablespoons Pine Nuts, toasted
1/4 cup (30grams) freshly grated Parmesan Cheese

Put a large pot of water on to boil for linguini.
Cook according to package directions and drain.

While the linguini is cooking, combine carrot leaves, olive oil, garlic and salt in a food processor until finely minced.
Add nuts *(I didn’t have any pine nuts on hand and used chopped walnuts instead; it was a gamble but it worked) and Pulse until finely chopped.
Pour prepared linguini into a mixing bowl, add pesto and parmesan cheese; stir well to combine.
Serve with a sprinkle of parmesan cheese and a sprinkle of hot chili flakes.

Serves 4