Autumn Rice Krispie Treats

I cut the lawn today and I am hoping it is the last time this year that I have to do that. I wanted to make sure the lawn was nice, neat and tidy before the onslaught of Fall leaves hits! I have two beautiful young Oak trees in the backyard that promise to give me a few good workouts this Fall!
When I came in from yard work I wanted to make something but meh, I looked at the Mixer waaaaay over on the other side of the kitchen, checked the fridge and the only butter I have on hand is in the freezer…
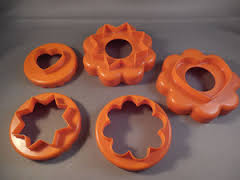
Then I spied that Tupperware container half full of Rice Krispies…and just this morning I had seen a bag of ‘mallows in the pantry….yup, I am going to make up some Rice Krisipie Squares…well, Treats as I didn’t make them in the conventional 9×13 baking pan; instead I got out my trusty Classic Tupperware Nesting cookie cutters and chose the largest one. Next I made up the Rice Krispie treats recipe as per directed on the box…wait, I don’t have the box, I have Tupperware; no worries, google to the rescue! You see, I was even too lazy to go and look in my beautiful Recipe Box for the printed recipe I have there.
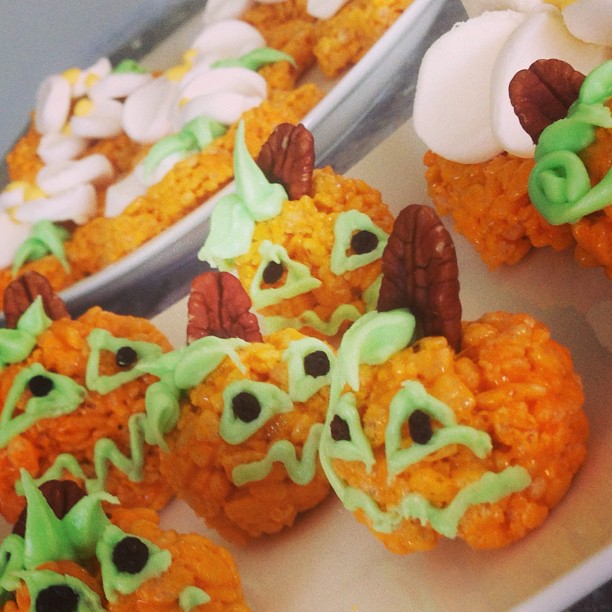
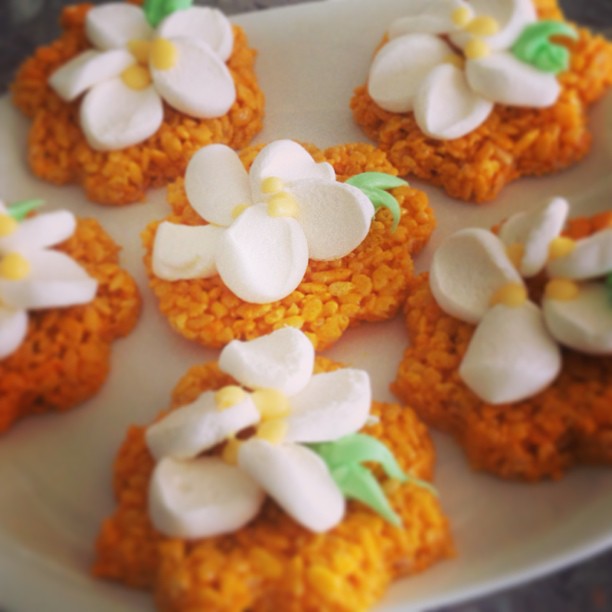
Anyway, back to the treats; when stirring the cereal into the melted ‘mallows I added a fair amount (1/4 teaspoon) of Wilton Butter Yellow Food Colouring Paste, then I turned the gooey mess out onto a piece of parchment paper I had lightly sprayed with vegetable oil spray, covered it with another piece of sprayed parchment paper, took the rolling pin to it, cut into shapes, rolled the scraps into little balls which would become pumpkins, done deal!
Well, then I had to decorate them. Using clean kitchen scissors I cut large ‘mallows into four bits which became the petals that decorated the Pumpkin Flowers. Then I whipped up a couple of batches of thick glaze, tinted one light yellow, the other green, loaded them into piping bags fitted with a small writing tip and piped stamen onto the white ‘mallow flowers, and using green, piped faces onto the pumpkins; changed the green writing tip to a leaf tip and piped leaves onto all.
Then I had to clean up the ooey, gooey, sticky, messy pot and other dishes….should have just dragged out the mixer and made Sugar Cookies!

Autum Rice Krispie Squares

1/4 cup Butter
1 pkg (10 oz, about 40) regular Marshmallows
-or-
4 cups mini Marshmallows
Splash of Vanilla
6 cups Rice Krispies cereal

Pecan Halves
Currants
1 cup Powdered Sugar
Water, to desired consistency
Food Colouring: Yellow, Green

Lightly spray (2) 21″ squares of parchment paper with vegetable oil spray; set aside.
In a large saucepan melt butter over low heat.
Add marshmallows and stir until completely melted.
Remove from heat; stir in vanilla and yellow food colouring.
Add rice krispies and stir until well coated.
Turn out onto prepared parchment paper and gently roll out to 1/2″ – 3/4″ thickness.
Cut with a large cookie cutter, dipped in water.
Roll scraps into various sized balls.
Top each rolled ball with half a pecan, forming the stem.

In a small bowl stir enough water into 1/2 cup of powdered sugar to give a semi stiff icing.
Tint Yellow.
Load into a piping bag fitted with a small writing tip and pipe stamen onto the centre of the flowers.

In a small bowl stir enough water into a 1/2 cup of powdered sugar to give a semi stiff icing.
Tint Green.
Load into a piping bag fitted with a small writing tip and pipe vines and faces onto the pumpkins.
Change tip to a small leaf tip and pipe leaves onto pumpkins and flowers.
Carefully place a currant in the centre of each eye.

Autumn Rice Krispie Treat Pumpkins

Spiced Pumpkin Scones

Simply the most wonderful Pumpkin Scones! It is that time of the year again; Pumpkin Lattes will be available at Starbucks, not that I ever go there but I do walk by their shops from time to time and they smell absolutely amazing with all the beautiful Fall spices! Brings to mind visions of beautiful orange, yellow and brown Maple leaves drifting to the ground. The crunch of said leaves under foot along the many beautiful trails in beautiful British Columbia…hey, that is what it says on the license plates! There is a crispness in the air and we are driven to thoughts of curling up in front of our fireplaces with a good book, a cup of good coffee and something yummy to nosh on. This Spiced Pumpkin Scone recipe I found last year fits the bill to the T! These scones are lightly adorned by not one, but two delectable glazes. Got your mouth watering? Get thee to the kitchen and get cracking on your own Spiced Pumpkin Scones!

Spiced Pumpkin Scones
Lovely Spiced Pumpkin Scones

2 cups Flour
1/3 cup Brown Sugar
1 teaspoon Baking Powder
1/2 teaspoon Baking Soda
1/2 teaspoon Salt
1 teaspoon ground Cinnamon
3/4 each, Ground Ginger, Ground Cloves
1/2 teaspoon ground Nutmeg
1/2 cup Butter, cold and cubed
1/2 cup Pumpkin Puree
1 Tablespoon Molasses
3 Tablespoons Half and Half
1 Egg
2 teaspoons Vanilla
Simple Sugar Glaze
1 cup Icing Sugar
1 – 2 Tablespoons Half and Half <–I use Luke’s Coffee Milk
Spiced Glaze
1 cup  Icing Sugar
1 Tablespoon Pumpkin Puree
Pinch each: Cloves, Nutmeg, Ginger, Cinnamon
1 – 2 Tablespoons Half and Half

Preheat oven to 400F.
Line baking sheet with parchment paper.

In large bowl combine flour, brown sugar, baking powder, baking soda, salt and all the spices.
Using a pastry blender or two knives, cut in cold butter until mixture resembles coarse crumbs.
In a small bowl or a large measuring cup whisk together pumpkin puree, molasses, half and half, vanilla and egg.
With a fork stir pumpkin mixture into flour mixture just until a soft dough forms.
Turn dough out onto a lightly floured surface.
Gently knead about 10 times.
Gently roll out to 3/4″ thickness and use

I use the bottom centre cutter for scones

Tupperware Fluted Cookie Cutter to cut out scones.
Place on prepared baking tray and bake for 10 – 15 minutes or until golden brown .
Transfer to a wire cooling rack to cool completely.
While scones are cooling prepare your glazes.
In small bowl stir together icing sugar and half and half to desired consistency.
Load into a Ziploc Freezer bag or a Piping Bag with a small writing tip .
In small bowl combine icing sugar, pumpkin puree, spices; add 1 Tablespoon half and half and stir, adding more half and half to get desired consistency.
Load into another Ziploc Freezer bag or Piping Bag fitted with a small writing tip.
Drizzle first one glaze then the other over the scones.
Let glaze set for about 15 – 20 minutes.
Enjoy!

Serves: 8 Scones


Pear Cobbler

My freezer is chockers with an abundance of summer fruits! I squeezed in a bag of pears prepped for jamming today but still had more pears left over than we are able to eat in a week.  I just made Apple Crisp the other day so Pear Crisp was out of the question. Hmmm? What to do with these pears? Oh! A Cobbler! I know it is practically the same as a Crisp but just different enough to make it seem like I wasn’t making the same thing twice in a matter of days.

While my Pear Jam was jamming, I headed over to Canadian Living.com to search out a recipe for Pear Cobbler and was not disappointed. Time was of the essence as I was in the zone and the jam only needed to jam for another 50 minutes. This cobbler was quick and easy to throw together; my one remorse was that I didn’t put my baking dish on a cookie sheet….now I have to clean my oven…again!
Oh, and I love how Canadian Living introduced the recipe…”Harvest an orchardful of flavour with this old-fashioned cobbler.”

Pear Cobbler
Pear Cobbler

7 cups Pears, peeled and sliced
1/3 cup Brown Sugar, packed
1 Tablespoon Cornstarch
1 Tablespoon Lemon Juice
pinch of Epicure Apple Pie Spice
Biscuit Topping
1 cup Flour
1/4 cup Sugar
1 teaspoon Baking Powder
1/4 teaspoon Baking Soda
pinch of Salt
1/4 Butter, cold and cut into cubes
3/4 cup Buttermilk

Preheat oven to 400F.
Lightly spray an 8″ Square Pyrex dish with vegetable oil spray.

In a large bowl, gently toss pears with brown sugar, cornstarch, lemon juice and Apple Pie Spice.
Turn out into prepared baking dish.
In a medium mixing bowl whisk together flour, sugar, baking powder, baking soda and salt.
Using a pastry blender, or two knives, cut in butter until crumbly.
Pour in buttermilk and stir with fork to form a soft, sticky dough.
Drop dough in 9 evenly spaced mounds over the fruit.
Bake in 400F. for about 35 minutes or until bubbly and topping is light golden and no longer doughy underneath when lifted with spoon.

Serves 6

Pear Jam

I wish I was a Canner, alas, I am not. Why then, did I purchase 20 pounds of pears?! I’ll tell you why; because I love canned pears! One of these days I will have to brave the world of home canning but that day is not today as I do not have a canner or the jars or the patience to learn something new.

What do I know? Jam. I know jam. Not many people know that Pear Jam is simply the best! You don’t find it on grocery store shelves but will find it in quirky little shops in farming communities. I love the way the house smells when I make pear jam. I like the way pear jam looks in the pantry. I like the gorgeous colour of the stuff. I could eat it straight out  of the jar but I am a grown up now and grown ups don’t do that, right?

If you have never had pear jam, you simply have to give it a go; it is so very easy to make! I found this super simple recipe for Countryside Pear Jam and loved it because: a) only four ingredients  b) did not call for Certo Pectin – that stuff is expensive! My 20 pound box of pears yielded me two batches of pear jam; one I cooked straight away and one I prepped and put in the freezer for later this winter when things get dreary. I also made a Pear Cobbler which required A LOT of pears!  The remaining few pears I kept for eating out of hand

.

Lightly spiced Pear Jam

8 cups Pears, peeled and chopped
4 cups Sugar
1/2 teaspoon ground Cinnamon
1/8 teaspoon ground Cloves
splash of Vanilla

Peel and chop pears into 8cup measuring cup.
Pour into large stainless steel pot.
Stir in sugar, cinnamon and cloves; bring to a boil over medium heat.
Reduce heat to low and simmer, uncovered, stirring occasionally, for about 60 to 90 minutes.
Stir in a splash of vanilla.
Remove the jam from heat, stir and skim off foam for about 10 minutes to prevent floating fruit.
Ladle jam into hot, sterilized jars, leaving 1/4″ headroom.
Wipe rims with a clean towel and seal.
Allow the jars to cool on a clean towel before storing in fridge for up to 6 months for unopened jars.

If you want to keep jam in the pantry then you will need to process your sealed jars in a boiling water canner for 10 to 11 minutes.
Remove from canner and allow to cool completely on clean tea towel before storing in a cool, dark place.

* I didn’t using the canning process because, quite frankly, I don’t see this jam hanging around for very long! I will give some away and keep some in the fridge.


Tater Tot Casserole

After a very long weekend of preparing fruit for the freezer, a toddler underfoot and 2 great big dogs demanding attention I had run out of energy but still needed to get dinner on the table to feed said Toddler. If left to my own devices?  A bowl of cereal would have been sufficient!
Alright, so Kid-Friendly food, requires no effort on my part and yet will satisfy the adults in the house? hmmm, I had seen Tater Tot Casserole on Pinterest, it came through my Facebook feed…might as well give it a go. I googled it and came up with a gazillion recipes! When inundated with responses like that I search out recipes from my Tried and True sites: Kraft (not that I use a lot of their product but I like their site’s format), Canadian Living, Taste of Home, Food Network. I went with the Kraft one as it was the top Hit; after reading some of the reviews I made a couple of little changes: added McCormicks Beef Stock cube and a layer of Fresh Spinach (to up the nutritional value!) and a handful of halved Grape Tomatoes for colour. Head on over to Kraft for the original version of Tater-Topped Casserole.
The verdict? Toddler didn’t like the taters!  Or the Spinach…to which Grandpa said that perhaps Benny needed to start watching Popeye to learn the value of Spinach! Hah! Grandpa thought it tasted like Hamburger Stroganoff and Ryan said it was a coronary waiting to happen and I wasn’t to make it again because it tasted so good he could have eaten the entire casserole on his own! It had ground beef in it so I didn’t have any…will have to give it another go using Yves Just Like Ground Round just so I personally can see what all the fuss is about.

Tater Tot Casserole
Everyone has to try Tater Tot Casserole at least once!

1 lb Ground Beef
2 Tablespoons Olive Oil
1/2 cup Onion, chopped
2 cloves Garlic, minced
6 large Mushrooms, sliced
1 McCormick’s Beef Stock cube, crumbled
1 (10 3/4 oz) can Cream of Mushroom Soup
1/2 cup Sour Cream
2 – 4 cups Fresh Spinach – 2 big handfuls of Fresh Spinach
1 cup shredded Cheddar Cheese
1/4 cup Parmesan Cheese

1 lb Frozen Tater Tots, or enough to cover casserole

Preheat oven to 375F.
Lightly spray 9″x13″ Pyrex casserole dish with vegetable oil spray.

In large skillet heat oil over medium-high heat and sautee onions for a few minutes.
Reduce heat to medium, stir in garlic and continue cooking for a few more minutes.
Add ground beef, breaking it up and browning evenly.
Add crumbled beef stock cube, mushroom soup and sour cream; stir and cook until heated through.
Pour into prepared baking dish.
Top beef mixture with a layer of fresh spinach followed by a layer of tater tots.
Bake in preheated oven for 30 minutes.
Remove from oven, top with shredded cheddar cheese and parmesan cheese; return to oven and continue baking for another 15 minutes.

Serves 6 – 8

Tater Tot Casserole with Roasted Cauliflower and Garden Salad