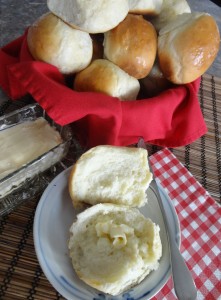
These are simply the BEST, quick and easy yeast rolls you will ever make. And make them you will, and often, because they are that easy and that incredibly yummy!
Admittedly, I already had a tried-and-true recipe for quick dinner rolls but when these popped up in my Facebook feed I simply had to try them. I have had favourable results with a lot of Kitchen Meets Girl recipes and figured this recipe for 30-Minute Dinner Rolls would be no different. I was right. I love being right, especially when it comes to food!
The Best Dinner Rolls you will ever have
1 cup + 2 Tablespoons Warm Water
1/3 cup Vegetable Oil
2 Tablespoons Active Dry Yeast
3 Tablespoons Sugar
1 teaspoon Salt
1 Egg, at room temperature
3 1/2 cups Flour
Preheat oven to 400F.
Lightly spray a 9X13″ pan with vegetable oil spray.
In mixing bowl combine warm water, oil, yeast and sugar.
Allow to rest for 15 minutes.
Using the dough hook, stir in 2 cups of the flour, salt, egg into the yeast mixture.
Add remaining 1 1/2 cups of flour slowly, about 1/2 cup at a time, mixing well after each addition.
On low speed, knead for about 5 minutes.
Turn out onto lightly floured surface, gather into a ball and knead a few times, until smooth and elastic.
Shape dough into 12 evenly shaped balls and place in prepared pan; cover with a clean tea towel and let rest for 10 minutes.
Bake in preheated 400F oven for about 10 – 12 minutes, or just until the tops are golden brown.
Remove from oven and turn out onto wire rack to cool slightly before serving.
Yield: 12 Dinner Rolls
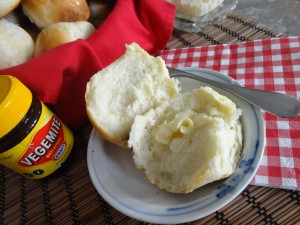
Oh, and BTW, they are absolutely incredible with Vegemite!
We always make a full pot of coffee in the morning and often there is heaps leftover at the end of the day. Some days I just …gasp…don’t feel like drinking coffee. (Today not being one of them…I am craving a cuppa and of course the coffee pot is empty!) In the Summer months this isn’t so much a problem; I just bottle what is left over, put it in the fridge and make ice cappuccinos as needed.
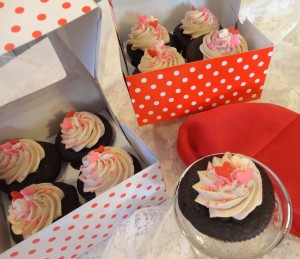
There is an ooey-gooey Saucy Mocha Pudding dessert that I like to make with left over coffee but there are just the two of us at home and I’m sorry, we simply could not eat a whole batch. I was so pleased when this recipe from Brown Eyed Baker for Mocha Cupcakes with Espresso Frosting came through my Facebook Feed!
Cupcakes are prefect, in my opinion, because you can make a whole batch, eat a few and put the rest in the freezer.
It just so happens that when I came upon this recipe, Valentine’s Day was just around the corner; rather than purchasing some expensive, quickly forgotten techy gadget I made these for my husband.
Mocha Cupcakes with Coffee Cream Frosting
1 1/3 cup Flour
1/3 cup Unsweetened Cocoa
1 teaspoon Baking Powder
1/2 teaspoon Baking Soda
1/4 teaspoon Salt
1/2 cup Milk
1/2 cup Strong Brewed Coffee, at room temperature
1 1/2 teaspoons Instant Coffee Granules
1 teaspoon Vanilla
1/2 cup Butter, softened
1/2 cup Sugar
1/2 cup Golden Yellow Sugar
1 Egg, at room temperature
Preheat oven to 350F.
Line Muffin Tin paper liners (12)
In a small mixing bowl combine flour, cocoa, baking powder, baking soda and salt; set aside.
In mixing bowl beat butter and both sugars on Medium-High speed until light and fluffy, about 2 minutes.
Add the egg and beat until combined.
In a measuring cup combine milk, brewed coffee, instant coffee granules and vanilla.
On Low speed, stir in 1/3 of the dry ingredients, stirring just until combined.
Add half the liquid ingredients and stir on low until smooth, about 30 seconds.
Add another 1/3 of dry ingredients, stirring just until combined.
Add remaining liquid ingredients, stir on low for about 30 seconds.
On Low, stir in remaining dry ingredients until well blended then increase speed to Medium – High and beat for about 2 minutes, scraping down sides of bowl once or twice.
Divide batter evenly between the 12 muffin cups.
Bake for 17 – 20 minutes or until a pick inserted in centre of the cupcake comes out clean.
Remove from oven to wire rack and allow to stand for 10 minutes.
Turn out to cool completely.
While cupcakes are cooling <- sometimes I hurry the process along by putting the cupcakes in the fridge or freezer for about 30 minutes -> prepare the
Coffee Cream Frosting
In a small bowl, combine vanilla and instant coffee granules.
In mixing bowl beat butter until light and fluffy, about 3 minutes.
Stir in 1 cup of the icing sugar until it is well incorporated; stir in vanilla mixture.
Add another cup of icing sugar and stir until incorporated.
Stir in remaining icing sugar, scrape down sides of bowl; once all sugar is incorporated, increase speed to Medium-High and beat for 3 – 4 minutes.
When cupcakes are completely cooled, load prepared frosting into a large piping bag fitted with a large star tip and pipe swirls onto each cupcake.
Sprinkle with desired decos.
Store in airtight container on Countertop for up to 2 days otherwise store in airtight container in the fridge for up to 4 days, 3 months in the freezer.
We don’t eat a lot of rice around here and it used to be that we always had Jasmine or Basmati rice but have recently switched to brown rice. Admittedly I used to be one of the worst rice cookers in the world; it was either burned onto the bottom of the pot…the cure for which is to pop popcorn in said pot and it miraculously comes clean…or it was undercooked and swimming in icky water. And yes, I had read the instructions on the packages of purchased rice but it refused to cook up nicely for me!
Then one day I just decided that I simply HAD to learn how to cook the stuff. I did a search on cooking rice, read cookbooks and then headed to the kitchen armed with my newfound knowledge. Determined to cook a perfect pot of rice, I measured the rice, measured the water and dumped out a 1/4cup, put the pot on high heat, brought it a boil, added a teaspoon or so of butter, some salt and pepper, put a lid on it…slightly ajar, reduced heat to a simmer, waited for the boil to settle to a simmer, put lid on tightly and walked away for 17 minutes. Voila, a perfect pot of rice!
What has this got to do with Baked Brown Rice? Well, once I started cooking brown rice I ran into all my old problems! Bah! Brown Rice! Why does it have to be better for you than white rice? Sigh. One weekend I had all the grandsons and two extra dogs underfoot and I needed to put a meal together that would cook itself, so to speak. Absolutely no time to babysit a cantankerous pot of rice! I happened to be making baked chicken and then it struck me, my grandmother used to bake rice all the time! I googled baking brown rice which lead me to How to Make Perfect Baked Brown Rice at In the Kitchen with KP; easy to follow directions and an hour later I was serving up Perfect Oven Baked Brown Rice!
(Picture to follow…I was so busy with grandsons and dogs that I didn’t have the time or inclination to take any photos!)
1 1/2 cups Short Grain Brown Rice
2 1/2 cups Water
1 Tablespoon Extra Virgin Olive Oil
1 teaspoon Sea Salt
2 teaspoons Garlic Powder
1 Mc Cormick’s Vegetable Stock Cube
Lightly butter an 8 inch Square baking dish or the equivalent ( 1.4 – 1.9l )
Preheat oven to 375F. – if baking dish is pyrex, lower temperature to 350F.
Boil water in kettle, measure into large measuring cup; add vegetable stock cube and extra virgin olive oil, stirring well to dissolved vegetable stock cube.
Add salt and garlic powder; stir.
Pour seasoned water into prepared baking dish.
Add rice, stir to combine.
Cover tightly with foil.
Bake on the middle rack of oven for 60 minutes.
Remove from oven, uncover and fluff rice with fork; serve immediately.
I had the grandsons over for the weekend and well, there is a sign in my kitchen that says ” A Grandmother Never Runs Out of Hugs or Cookies” and I had made a deal with the boys that if Granny’s TARDIS cookie jar was ever empty, I owed them $5! On the morning of their arrival I whipped up a batch of Welsh Cakes which quickly filled the TARDIS but they just as quickly demolished them!
Now normally I don’t have a problem keeping cookies in the TARDIS but seems Mother Hubbard’s cupboards were pretty low on this particular weekend …therefore no eggs to bake with. ( I subbed in Egg Replacer in the Welsh Cakes)
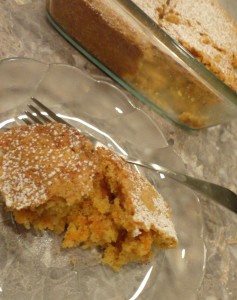
I did have a bunch of carrots that needed using up so I googled Egg Free Carrot Cake which resulted in this Ingredients Only list over at TheAnswerIsCake. When I tried to follow the link to the full recipe I came upon a broken link…hate broken links! S’all good, I know how to bake a cake…
Everyone loved the Carrot Cake! I don’t think anyone even noticed the lack of eggs and no one complained that it was not sporting the regular Cream Cheese Frosting they all expect on Carrot Cake; I didn’t think an Egg Free Carrot Cake should be “contaminated” with a dairy product topping so I just gave it a light dusting of icing sugar. Yum!
Egg Free Carrot Cake
1/2 cup Margarine
1/4 cup Brown Sugar
3/4 cup Sugar
1 teaspoon Vanilla
1 cup Grated Carrots
1 1/4 cups Flour
1 1/2 teaspoon Baking Powder
1/2 teaspoon Salt
1 teaspoon Cinnamon
1/4 cup Almond or Soy Milk
1 cup chopped Nuts, Pecans or Walnuts
2/3 cup Coconut
Preheat oven to 350F.
Lightly spray a 9Inch Square baking dish with vegetable oil spray; coat lightly with flour, tapping out excess flour.
In a small mixing bowl combine flour, baking powder, salt and cinnamon; set aside.
In mixing bowl cream together margarine, brown sugar, sugar and vanilla; beat for a minute.
Stir in grated carrots.
Stir in half the dry ingredients followed by the almond milk.
Add remaining dry ingredients, stir, increase speed to beat for another minute.
Fold in chopped nuts and coconut.
Turn batter out into prepared pan and bake in 350F. oven for 25 – 30 minutes or until pick inserted comes out clean.
Place on wire rack and cool for 10 minutes before turning out of pan to cool completely on wire rack.
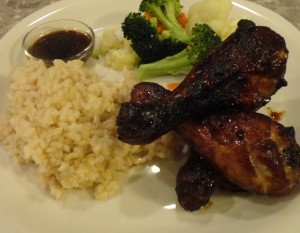
I make these using either chicken drumsticks or chicken wing drumettes. They are super easy to make and are always well received.
Low Carb Chicken Drumettes or Drumsticks
1/2 cup Olive Oil
1/2 cup Soy Sauce
1/2 cup SPLENDA Granular or Sugar Substitute of your choice
2 Tablespoon Ginger, grated
3 cloves Garlic, minced
1/2 teaspoon Hot Chili Flakes
3 lbs Chicken Drumettes or Drumsticks
In large Ziploc Freezer Bag or Tupperware Season-Serve combine olive oil, soy sauce, SPLENDA, ginger, garlic and hot chili flakes.
Add chicken and marinate chicken overnight or for at least 4 hours.
Preheat oven to 350F.
Line 2 baking trays with foil and lightly spray with vegetable oil.
Place marinated chicken prepared baking trays.
Brush with marinade; return marinade to refrigerator.
Bake in preheated oven for 25 minutes.
Baste chicken again with remaining marinade.
Bake for another 20 minutes.
Place under Broiler for a few minutes, if necessary; watch carefully!
Serve with Steamed Vegetables and a Garden Salad if watching Carb intake.
If not watching carbs, serve with Steamed Brown Rice.
Yield: 10 Servings
1 Serving = 407.1 Calories, 25.3 g Protein, 32.6 g Fat, 1.9 g Carbs
Welcome to my Kitchen where the most important ingredient is Love.