Raspberry Pinwheels

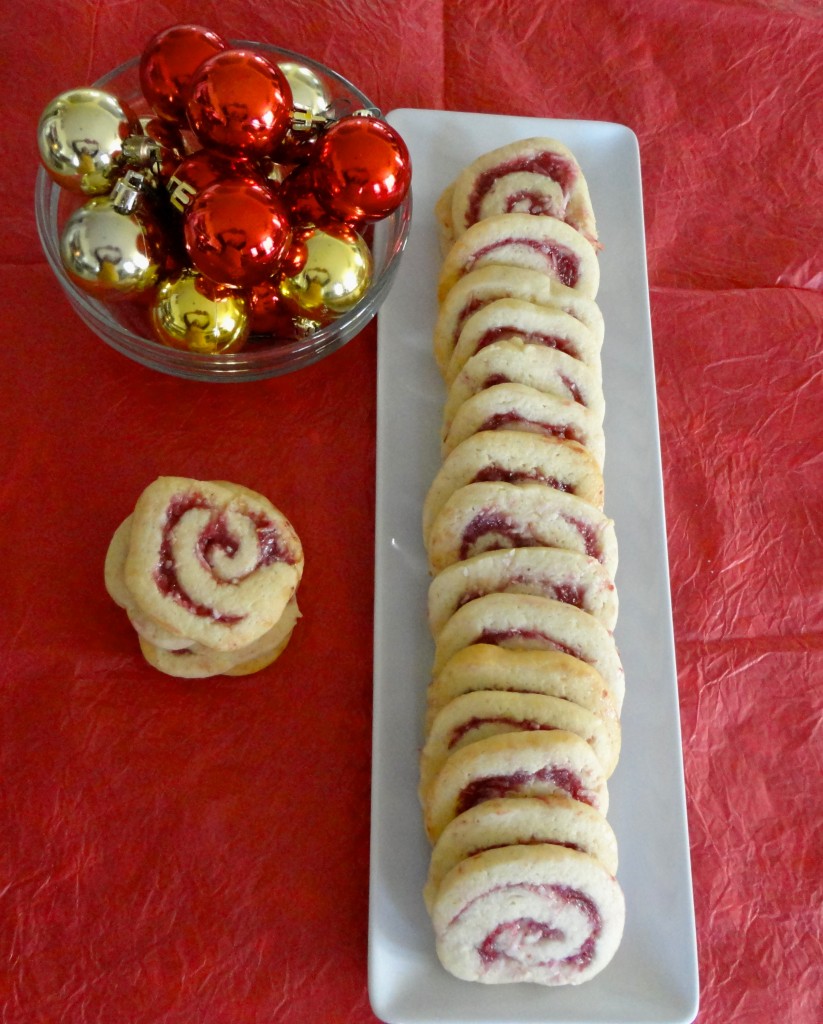
I can’t remember how many years ago I started making these Raspberry Pinwheels? It has been a while. The page has long since fallen out of the Robin Hood Christmas Baking booklet I got a gazillion years ago along with one of my Christmas Canadian Living magazines.
I don’t know why I make these…I recall many a baking days where I would be cursing under my breath because I couldn’t get the dough to roll out. I can happily say I got it sorted out and can whip these up with no problems what so ever now…really, listen to the directions and roll the dough out between to sheets of parchment paper…I give the bottom piece a super light dusting of flour before I begin. Another thing to remember, this is NOT the time to flex your muscles…use even, light rolling…if you use too much pressure, yea, you will be cursing like a sailor! Trust me on this one.
My family does not like nuts in cookies so I have only made these with the Walnuts once but man, were they good! Oh, but they DO like nuts in Date Nut Pinwheels…go figure? If your family will allow it, definitely add the chopped walnuts.

Raspberry Pinwheels
Raspberry Pinwheels

2 cups Flour
1 teaspoon Baking Powder
1/4 teaspoon Salt
1/2 cup Butter, softened
1 cup Sugar
1 Egg
1 teaspoon Vanilla
1/2 cup Raspberry Jam
1/2 cup Fine Coconut
1/4 cup Walnuts, finely chopped (optional)

Preheat oven to 375F.
Line 4 baking trays with parchment paper.

Combine flour, baking powder and salt in a small bowl; set aside.
Cream butter, sugar, egg and vanilla thoroughly.
Mix dry ingredients into creamed mixture.
Roll dough between 2 sheets of parchment paper to a 12″x9″ rectangle.
In a small bowl, combine raspberry jam, coconut and walnuts, if using; spread evenly over dough to within 1/2″ of edges.
Roll up tightly, jelly-roll fashion, starting from long side.
Gently press edge to seal.
Wrap in parchment paper and chill overnight. (Or for at least 4 hours)
Cut into 1/4″ thick slices and places on prepared baking sheets.
Bake at 375F for 8 – 10 minutes, or until golden.

Makes about 40 cookies

Ginger Crinkles

Now, you know that I like to give credit where credit is due but I really do NOT know where I got this recipe from. Every Christmas I hauled the faded old recipe card out of the recipe box and made these Ginger Crinkles. In fact, last year I had to rewrite the recipe onto a new card because I simply could not read the old one anymore!
Wherever I got the recipe from, I am sure glad I did! It is one of my favourites.

ginger crinkles
Ginger Crinkles

3/4 cup Butter, room temperature
1 cup Brown Sugar, packed
1 Egg
1/4 cup Fancy Molasses
1 teaspoon Vanilla
2 cups Flour
2 teaspoon Baking Powder
2 teaspoons ground Ginger
1 teaspoon ground Cinnamon
1/2 teaspoon ground Allspice
1/4 teaspoon ground Cloves
1/2 teaspoon Salt
1/4 cup Sugar for Rolling Cookie Dough in

Preheat oven to 350F.
Line 4 baking trays with parchment paper.

In a medium mixing bowl combine flour, baking powder, salt and spices; set aside.
In large bowl, beat butter with brown sugar until well blended.
Add egg, molasses and vanilla; beat until smooth.
Stir half the flour mixture into the creamed mixture, until well incorporated.
Stir in remaining flour mixture and stir until no flour is visible.
Gather into a ball, place in a small bowl, cover with plastic wrap and refrigerate for about an hour. Or you can speed things up a bit by placing in the freezer compartment for 30 minutes.
Roll about 1 1/2 teaspoons of dough into a ball; roll in sugar and place about 2″ apart on prepared baking tray.
Repeat with remaining dough.
Bake in preheated 350F oven for about 12 minutes, rotating trays at 6 minutes; cookies will flatten slightly, have cracked tops and bottoms are lightly browned.
Let cool on baking trays on wire racks for about 5 minutes before transferring to wire rack to cool completely.

Makes about 4 Dozen Cookies

Light and Fluffy Dinner Rolls

I have recently discovered the Dough setting on my Breadmaker and am putting it to good use! Why don’t I just make bread from scratch, you ask? Let’s face it, I just am not tall enough, nor are my counters low enough to ensure comfortable Kneading…and bread dough begs to be kneaded for 8-10 minutes. For these two reasons I have decided to let my machine do the hard work for me. That isn’t cheating, is it?

I really need to unsubscribe from Chocolate, Chocolate and More on Facebook because everyday something comes through the feed that I just HAVE to make! Heaven knows I simply do not have the time or the people on hand to eat all of the stuff I want to make…
That said, I am delighted to have had this recipe for Light and Fluffy Dinner Rolls come through because I often make soups and stews which are so much better with home made bread or buns.

Light and Fluffy Dinner Rolls
Super Light and Fluffy Dinner Rolls

1 1/2 cups Hot Water, from the tap
1/3 (65g) Vegetable Shortening, cubed
1/4 c Sugar
1 teaspoon Salt
1 Egg, well beaten
4 cups Flour
2 1/4 teaspoons Active Dry Yeast  (1 pkg)

In bread mixer pan add ingredients in order listed.
Use the Dough setting on your Bread Maker ( usually 1 1/2 hours)
Turn dough out onto lightly flour surface and knead into a smooth ball.
Portion dough evenly into 12 – 15 pieces.
Shape each portion into a ball and place in greased 9X13″ pan.
Cover lightly with oiled plastic wrap or L-Foil and let rise until doubled, about 45 minutes.
Bake in preheated 375F oven for about 15 – 18 minutes, until golden on top and sounds hollow when you tap on the surface.
Remove from oven, immediately brush with butter.
Turn out onto wire rack to cool completely.

* I used a 9X13″ but portioned my dough for 16 pieces instead of 12! I put the extra dough into 2 lil ramekins and baked along side the big pan of rolls.

If making by Hand:
In bowl of your mixer, combine 2 cups flour, sugar, salt and yeast.
Use paddle attachment and add hot water.
Mix on Low speed until all combined.
Add shortening and egg, continuing to stir until well blended.
Switch to dough hook and add remaining flour.
Knead dough for 10 minutes.
Dough will be very soft and sticky.
Transfer dough to a large greased bowl, turning dough to coat.
Cover with a damp towel and let rise in a warm location until doubled in size.
Turn dough out onto a floured surface.
Roll dough into smooth ball, cut into four equal pieces and then those four pieces into three pieces each to give you a total of 12 rolls.
Shape each piece into a ball and place in a greased 9×13″ pan.
Cover with towel and let rise again until doubled, about 45 minutes.
Bake as directed above.

Yield: 12- 18 Dinner Rolls


Cocoa Ginger Crisps

These are aptly named…Crisps. They are delightful lil bites of chocolately crispness with just a hint of ginger. This recipe for Cocoa Ginger Crisps from Chocolate Chocolate and More caught my eye when it came through my FB feed because they contained Ginger and since I like just about anything with ginger I thought I would give these a try. I will probably add a lil more ginger the next time I make them, because there WILL be a next time, as I couldn’t really taste the ginger at all. They were super easy to make and I found that I did not have to let the dough rest in the fridge before scooping out with my lil Pampered Chef scoop. However,  I already had bread dough on the go, so once I had rolled each individual cookie in the cocoa/sugar mixture I did place them in a sealed container in the fridge to bake after the bread came out of the oven.

I am experimenting with Egg-less baking because I often bring  tasty lil treats to a school that I work at and one of the students has an egg allergy. I found this recipe worked very well with Egg Replacer. I didn’t want to use Chia Seeds as an Egg Replacement because I find the Chia Seeds don’t break down very well; though now that I think about it, the extra texture would not have hurt these cookies.  I will have to give that a go next time. I should also note that I did not have light corn syrup in the pantry but DID have dark corn syrup…easily subbed in the dark for the light…and as I am typing this it just occurred to me that I will also replace 2 Tablespoons of the corn syrup with Molasses next time to try to achieve that  Ginger Cookie taste the name of this recipe conjures up in my mind.

cocoa ginger crisps
Just a hint of Ginger in these Cocoa Ginger Crisps

1 cup Butter, softened
1 + 1/3 cup Sugar, divided
1 Egg  (2 Tablespoons Water whisked together with 1 Tablespoon Egg Replacer)
1/4 cup Light Corn Syrup ( 2 Tablespoons Molasses, add enough Light Corn Syrup to measure    ……                                          1/4cup)
1 teaspoon Vanilla
2 cups Flour
6 Tablespoons (3 oz) + 1 1/4 teaspoons Cocoa, divided
2 teaspoons Baking Soda
3/4 teaspoons ground Ginger
1/4 teaspoon Salt

Preheat oven to 350F.
Line baking trays with Parchment Paper.

In a small mixing bowl combine flour, 6 Tablespoons (3 oz) cocoa, baking soda, ginger and salt; set aside.
In a small flat bowl combine 1/3 cup sugar and 1 1/4 teaspoons cocoa; set aside.
In large mixing bowl beat butter, sugar and egg (Egg Repalcer) until light and fluffy.
Add corn syrup (corn syrup/molasses mixture, if using) and vanilla; beat until well blended.
Gradually add dry ingredients to butter mixture, beating until well blended.
Using a #2 Pampered Chef scoop, portion dough, rolling each one in the sugar/cocoa mixture.
Place about 2″ apart on prepared baking trays.
Bake in 350F oven for about 10 – 12 minutes or until cookies flatten.
Cool for a minute on baking trays before transferring to cool completely on a wire rack.

Yield: About 4 1/2 Dozen


Homemade Bisquick Mix

Often a recipe will call for Bisquick Mix…who buys that stuff? Not me. Never have, never will. I usually just whip up a batch of BP Biscuit dough and use that but sometimes you just don’t have time to go through the added time of making the BP dough. Then it struck me that someone surely would have come up with a homemade version, right? Right! Homemade Biscuit Mix. at Food.com had what I was looking for. Now I try to keep a batch of this in the fridge during the cooler winter nights so I can easily whip up a batch of biscuits or use in recipes calling for Bisquick Mix.

6 cups Flour
3 Tablespoons Baking Powder
1 cup Milk Powder
1 Tablespoon Salt
1 Tablespoon Sugar
1 cup Vegetable Shortening, cubed

Combine flour, baking powder, salt and sugar in food processor bowl; whir a couple of times.
With motor running, drop cubed shortening through the feeder tube and process just until mixture resembles coarse crumbs.
Store in sealed container in the fridge for up to 4 months.
Use whenever a recipe calls for Bisquick Mix.

* If you don’t have a food processor:
Sift flour, baking powder, salt and sugar together in a large mixing bowl.
Use a pastry blender, two knives or your hands to cut shortening into the flour mixture until it resembles coarse crumbs.