So it is interesting to cook around here; I am a Vegetarian and have been for the past 33 years so no, I am not about to start eating meat…no, not even a lil bit! However, my husband of 13 years is NOT a Vegetarian. For the first 10 years that we were together I continued cooking Vegetarian meals; he didn’t complain. Oh wait, he had been eating his own cooking for a number of years…he was probably just happy to have someone cook for him! Two years ago he tried Atkins which meant A LOT of meat!
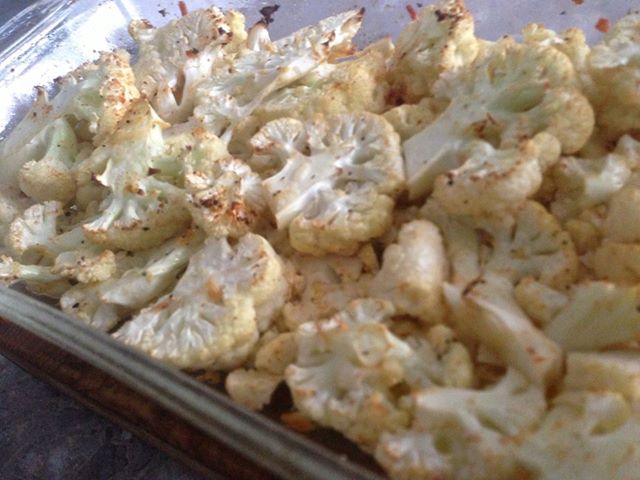
Once Luke started eating meat again he confessed that he didn’t really like vegetables and particularly cauliflower. He conceded that this recipe for Roasted Cauliflower that I found over at Simply Recipes was the best yet….next to Frosted Cauliflower…which I think he likes because it is slathered in a cheesy sauce. This Roasted Cauliflower is plain, simple and tastes oh, so good.
Simply Roasted Cauliflower
1 head of Cauliflower
3 – 4 cloves Garlic, peeled and minced
Lemon Juice from half a Lemon
Olive Oil
Coarse Salt and freshly ground Black Pepper
Parmesan Cheese
Preheat oven to 400F.
Cut cauliflower into florets and put in a single layer in an oven-proof baking dish.
Toss in the garlic.
Sprinkle lemon juice over cauliflower and drizzle each piece with olive oil.
Sprinkle with salt and pepper.
If the oven hasn’t reached 400F. yet, set aside until it has.
Place casserole in the hot oven, uncovered and bake for 25-30 minutes, or until the top is lightly brown.
Test with a fork for desired doneness.
Fork tines should be able to easily pierce the cauliflower.
Remove from oven and sprinkle generously with Parmesan cheese.
Serve immediately
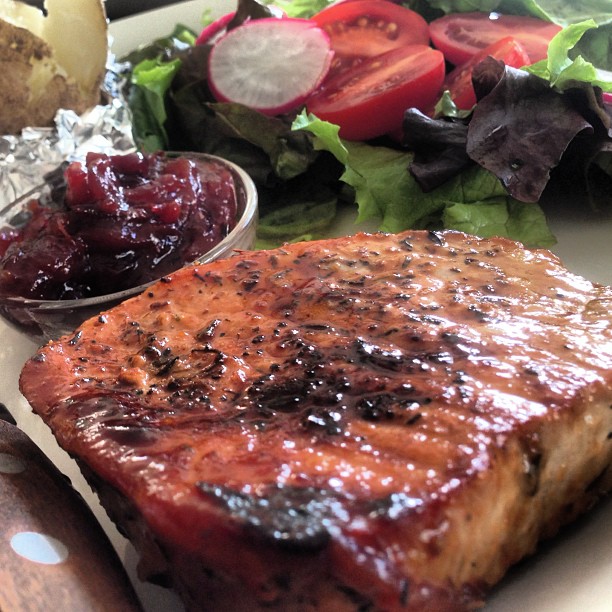
I honestly don’t remember how I came across this recipe? What could I possibly have been googling? Well, I had pork chops in the fridge, that I know for sure. But cranberries? It must have been a fluke that I had some tucked away in the freezer? It went over well with the meat eaters and it smelled pretty good while it was cooking. At any rate, I found this recipe for Pork Chop Saute with Cranberries over at Eating Well. Head over there for a peek at all their great recipes!
Easy enough to pull together for a meal on a busy week night.
Pork Chops with Cranberries
1/4 teaspoon dried Thyme Leaves
1/4 teaspoon Salt, divided
1/4 teaspoon Pepper, divided
4 boneless Pork Loin Chops (1 – 1 1/4 lb), trimmed of fat
2/3 cup Cranberry or Orange Juice
2 1/2 – 3 Tablespoons Honey
2 teaspoons Canola Oil
1 small Onion, sliced
1 cup Cranberries, fresh or frozen, thawed, coarsely chopped
Mix thyme and 1/8 teaspoon each salt and pepper in a small bowl.
Sprinkle both sides of the pork chops with thyme mixture.
Stir until well blended the cranberry juice and honey in a 1-cup Pyrex measuring cup.
Heat oil in a large nonstick skillet over medium-high heat until hot but not smoking.
Add the pork chops and cook until browned on both sides, 2 – 3 minutes on each side.
Push the chops to one side of the pan, add onion to the empty half of the pan and cook, stirring, until the onion is soft and beginning to brown, about 1 – 2 minutes.
Pour half the juice mixture into the pan.
Add cranberries.
Reduce heat to medium and cook, turning the chops occasionally, until cooked through 2 – 4 minutes.
Transfer the chops to a serving plate and tent with foil to keep warm.
Add the remaining juice mixture to the pan.
Increase heat to high and cook until the mixture reduces to form a syrupy sauce, about 2 minutes.
Season with remaining salt and pepper.
Spoon sauce over the chops.
Serve with Pan Fried Potatoes, or Steamed Rice and Steamed Broccoli
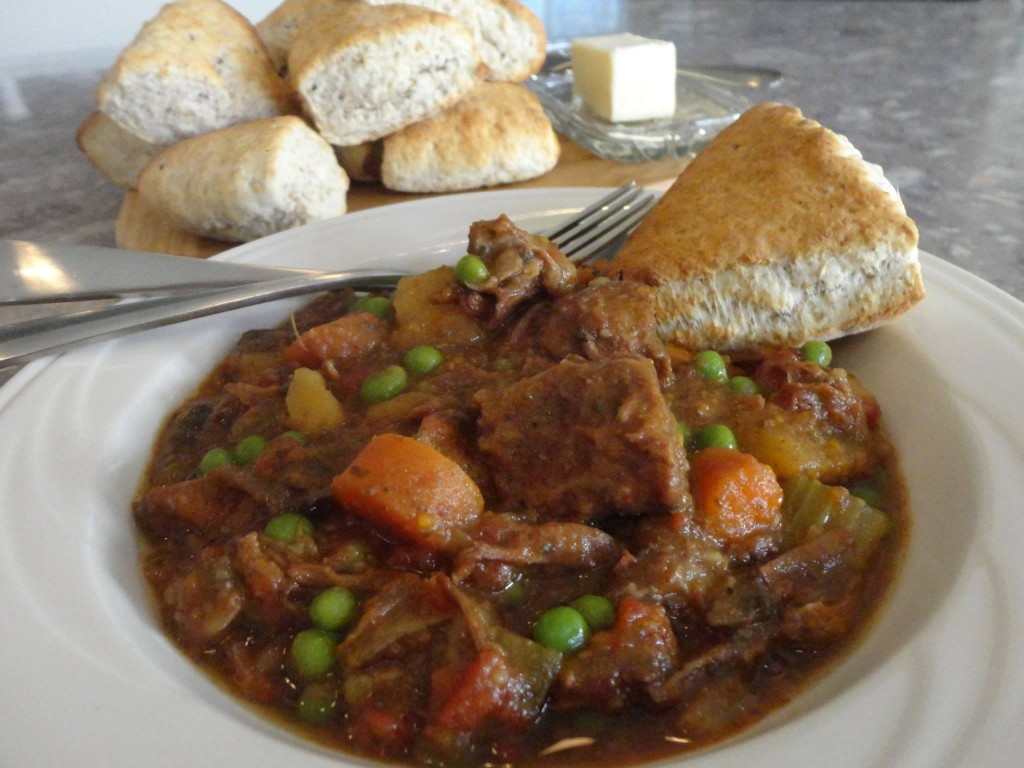
With cooler temperatures prevailing it’s time to haul out the slow cooker for some comforting stews; and don’t forget to make yummy bread to go with it: Dinner Rolls,Biscuits, Dumplings or pick up some Multigrain Rolls from the grocery store on the way home from work.
Satisfying Slow Cooker Beef Stew
2 lb Stewing Beef cubes
4 Potatoes, peeled and cut into large chunks
3 Carrots, peeled and sliced
2 ribs Celery, chopped
1 large Onion, chopped
3 cloves Garlic, minced
1 1/2 cups Beef Broth
1 (5oz can) Tomato Paste
1 Bay Leaf
1 Tablespoon Worcestershire Sauce
1 cup frozen Peas
Salt and Pepper, to taste
2 Tablespoons Corn Starch or Flour
For ease of cleaning I like to spray the inside of the crock pot with vegetable oil spray.
Cut beef into 1″-cubes.
In 4.5-6litre Slow Cooker mix together beef, potatoes, carrots, celery, onions, garlic, beef stock, tomato paste, bay leaf and Worcestershire sauce.
Cover and cook on LOW for 10 – 12 hours (or on HIGH for 5 to 6 hours) or until beef and vegetables are tender.
30 – 60 minutes before serving, add frozen peas, salt and pepper.
Increase heat to HIGH.
Whisk corn starch with a bit of water to make a paste; stir into stew.
Cover and cook for another 10 – 15 minutes.
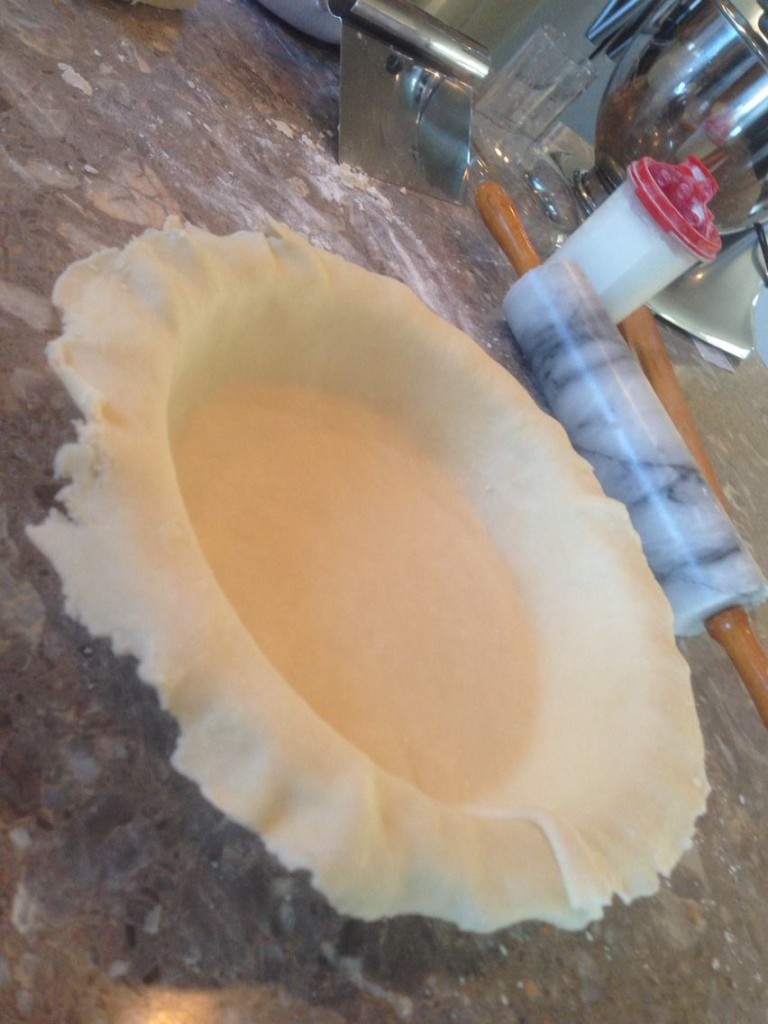
Thank you, Canadian Living! For years I have used the pie crust recipe from Betty Crocker’s Cookbook which calls for shortening instead of lard and let me tell you, it no longer works for me. I used to do alright with that recipe but I think the structure of Crisco Shortening has changed over the years; it is heaps softer now than it used to be…which would explain why it no longer works in my old recipe. I will give Crisco Shortening one last go, putting the shortening in the freezer the night before I want to make pie dough; otherwise, I will stick with this new recipe I found at Canadian Living. This pastry dough is made super simple with the aid of a food processor but works just as well if you use a pastry blender and do all the work by hand.
And it rolls out like a dream; I didn’t swear a single time rolling out this dough! I can assure you, prior to finding this recipe, you could hear me cursing like a pirate as I attempted to make something of the mess of flour I turned out of my mixing bowl.
I might also add that I was always intimidated by Anna Charlie’s AMAZING pies! I would watch in amazement as she effortlessly made her perfect pie crust with nary a cuss word punctuating her difficult task at hand. She always remained so peaceful as she worked. Maybe the next time I see her rolling up her sleeves to make pie dough I will jump in to help …can never hurt to work along a pro and get some helpful tips!
Simple Pie Dough
Double Crust 9″ (23cm) Pie
2 1/2 cups Flour
3/4 teaspoons Salt
2/3 cup COLD, unsalted Butter, cubed
1/3 cup COLD Lard, cubed
1/2 cup COLD water, approximately
In bowl of food processor, blend flour and salt.
With processor running, add cubed butter and lard through the feed tube; pulse a few times when all the butter and lard has been added.
Turn processor to ON and pour in water through feed tube; once all the water is added, pulse a few times.
Do NOT process until it forms a ball.
Turn out onto work surface and shape into 2 discs; work quickly but gently – pie dough does not like to be …man-handled…
Roll out dough, with a lightly floured rolling pin, to about 12″; roll gently but firmly, working out from the centre, rotating the disc as you go, easing up on the pressure as you get towards the outer edges so it doesn’t get too thin on the outside and too thick in the centre.
As circle grows you won’t be able to rotate it anymore; continue rolling from the centre out, imagining a clock face and rolling towards each number on the clock. (Make sense? Sure worked for me to have an image in my head to work with!)
Carefully fold dough into fourths by first folding it in half, creating a semi circle; then fold that in half.
Carefully and gently lift the dough and place in pie pan, with the point in the centre of the pan; unfold and gently ease to fit snuggly into pie plate.
Run a knife around the edge of the pie plate to trim off excess dough.
Add filling; just before you add the top crust you will brush the edges of the bottom crust with milk to ensure a good seal.
Roll out second disc of dough, place on top of filled pie shell, seal edges and flute.
Need help on how to Flute a Pie? Click on the link for a detailed explanation.
Brush top of pie with an Egg Wash for a Savoury Pie, Milk with a light sprinkle of Sugar for a Sweet Pie.
I cover the edges of pies with a long strip of Aluminum Foil to prevent super browned edges; remove during the last 15-20 minutes of baking.
Bake as directed in your recipe
A – Absolutely Wonderful
U – Under Glorious Blue Skies
T – Temperatures dropping
U – Unusually Brilliant Orange, Red and Brown Colours Abound
M – Misty Mornings
N – Noshing on Everything Pumpkin and Spice
I have long loved Pumpkin Spice Lattes at Starbucks but am not a fan of the tummy ache that accompanies them. So sorry, I just can’t stomach Soy Milk anymore. I was pleased to have this Pumpkin Spice Latte recipe come through my Facebook feed. I did change it up a lil bit: subbed in Almond Milk for the Milk, Xylitol for the Sugar and my own Spice Mixture for the Pumpkin Spice. Lucky for me I am often making Pumpkin this or Pumpkin that at this time of the year so I always have a bit of Pumpkin Puree hanging out in the fridge.
Homemade Pumpkin Spice Latte
2 cups Almond Milk (milk of your choice, really)
2 Tablespoons Pumpkin Puree (or Torani Pumpkin Spice Syrup <—don’t even know what that is)
1 – 2 Tablespoons Xylitol or Sweetener of your Choice
2 Tablespoons Vanilla
1/2 teaspoon Pumpkin Pie Spice, plus more to garnish
1/4 cup Espresso or 1/2 cup Strong Brewed Coffee
Whipped Cream, to garnish
In a saucepan whisk together almond milk, pumpkin and sugar; cook on medium heat , stirring, until steaming.
Remove from heat, stir in vanilla and spice.
Transfer to a blender and process for 15 seconds, until foamy.
-If you don’t have a blender you can: use a Stick Blender or
– Whisk the mixture with a wire whisk until foamy
Pour into 2 coffee mugs.
Add espresso on top.
Top with whipped cream, if desired.
Sprinkle with pumpkin pie spice.
Serves: 2
Pumpkin Pie Spice
4 Tablespoons Cinnamon
3 teaspoons Nutmeg
4 teaspoons Ginger
3 teaspoons Allspice
Combine all ingredients together.
Store is small, airtight jar.
Welcome to my Kitchen where the most important ingredient is Love.