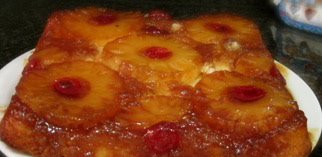
Pineapple Upside Down Cake

There is no taste like home! The smell of Pineapple Upside Down Cake followed by the sight and taste of it is like a trip down memory lane! Not that we had it often when I was growing up, but what a special treat!

Pineapple Upside Down Cake

1 (420g) can Sliced Pineapple, drained, reserving the juice
1/4 cup Butter, melted
3/4 cup Brown Sugar
Maraschino Cherries (optional)

2 3/4 cups Flour
4 teaspoons Baking Powder
1 teaspoon Salt

1 cup Butter
1 1/2 cup Sugar
2 Eggs
1 1/2 teaspoon Vanilla

1 1/3 cup Juice (from reserved juice and enough water added to measure 1 1/3 cup)

Lightly spray a 9x13inch pan with Vegetable Oil Spray.
Preheat oven to 350F (175C)
Drain Pineapple, reserving liquid.

Pour melted butter into prepared pan; sprinkle with brown sugar.
Arrange pineapple slices over butter/brown sugar mixture.
Place a cherry in the center of each ring.

In small mixing bowl, combine flour, baking powder and salt; set aside.

In mixing bowl, cream butter and sugar until light and fluffy.
Add eggs, one at a time, beating well after each addition.
Add vanilla and beat for one minute.
Add flour alternately with pineapple juice, beginning and ending with dry ingredients.
Evenly spread batter over pineapple rings.
Bake in 350F (175C) oven for 40 minutes or until pick inserted in center comes out clean.
Cool in pan for 5 minutes, the turn out.

Serve warm with a scoop of Vanilla Ice cream or a dollop of Whipped Cream.

Variation:
Fruit Cocktail Upside Down Cake: Substitute a can of Fruit Cocktail for the Pineapple. Add 1/2 teaspoon Almond Extract with the Vanilla.

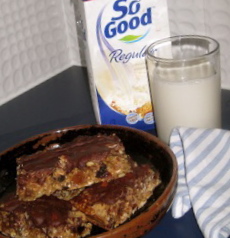
Sonte’s Granola Bars

When making up your weekly batch of Granola, have another bowl on hand to mix up the ingredients for these Granola Bars so you can have a healthy, nutritious snack at work, at school or at play!

Fruit and Nut Filled Granola Bars

1. 4 cup Old Fashioned Rolled Oats
2. 3/4 cup Brown Sugar
3. 1/2 cup Wheat Germ
4. 1/4 cup Ground Flax Seed
5. 1/2 cup Sunflower Seeds
6. 1/2 cup Pumpkin Seeds
7. 1/4 cup Sesame Seeds
8. 2 generous teaspoons Cinnamon
9. 1 cup Whole Wheat Flour
10. 1/2 cup Flour
11. 3/4 cup Raisins (soaked in hot water for 10 minutes, then drained well)
12. 1 cup Coconut
13. 1 cup chopped Dried Apricots (optional)

3/4 cup Honey
2 Eggs
1/2 cup Vegetable Oil
3/4 cup Applesauce
1 Tablespoon Vanilla

2 cups whole Blanched Almonds

Preheat oven to 350F (175C)
Prepare a 11x15x1 inch (28x38x2.5cm)  baking tray by spraying lightly with vegetable oil spray.

Combine first 12 ingredients together in a large bowl.
In small mixing bowl, combine honey, eggs, vegetable oil, applesauce and vanilla.
Stir liquid ingredients into dry ingredients until well blended.
Press into prepared pan.
Bake in 350F oven for 12 minutes.
Remove from oven, sprinkle evenly with whole almonds, gently press the almonds into the granola bars.

Return to oven and continue baking for 12 to 17 minutes.

Score into bars and let cool for 30 minutes.
Cut into bars and allow to cool completely.

Store in airtight container.

NOTE: Luke loves chocolate so when they are finished baking, I sprinkle with 200g Chocolate Chunks, return to turned off oven for 2 minutes, remove from oven and spread melted chocolate to cover the whole pan of granola bars.
Looking for a yummy yogurt topping to replace the chocolate….

Ultimate Cheesecake

Cheesecakes take a little extra work to make but are so worth the effort. This version of cheesecake is inspired by one I found in a Canadian Living magazine.

Ultimate Cheesecake - Add Topping of your choice

Crust
1 1/2 cups Cookie Crumbs; Chocolate, Arrowroot, Gingersnaps, Vanilla
1/4 cup sugar, give or take, depending on what kind of cookie crumbs you use
2 Tbsp Honey if using Arrowroot, Vanilla or Gingersnap cookie crumbs
1/4 cup Butter, melted

Cheesecake
2 (250g) pkgs cream cheese, softened
3/4 cup Sugar
2 Eggs
1 Tbsp Lemon Juice
2 tsp Vanilla
1/4 teaspoon Salt
2 cups Sour Cream

Topping of your choice: Strawberry, Blueberry, Raspberry, Cherry, Apple Crumble

Crust:
Preheat oven to 325F.
In small mixing bowl, combine cookie crumbs, sugar and melted butter.
Press into 9″ Springform pan.
Place springform pan onto a large square of foil; press foil up sides of pan, rendering springform pan watertight.
Bake in 325F oven for 8 to 10 minutes.
Cool.

Cheesecake:
In large mixing bowl, on low speed, beat cream cheese just until no lumps remain.
Gradually add sugar.
Add eggs, one at a time.
Gradually beat in lemon juice, vanilla, salt and sour cream; beat on low speed for a few minutes.
Pour into prepared crust.

Set foil covered springform pan in a larger pan
Pour in enough hot water to come 1″ up the side of the springfrom pan.
Bake in the centre of a 325F oven and bake for 60 minutes or until no longer shiny and edge is set. The middle may appear to still be a bit jiggly.
Run knife around edge of cheesecake.
Cool cheesecake for an hour in turned off oven, with door ajar.
Remove cheesecake from bain marie and cool completely on wire rack.
Cover with plastic wrap and refrigerate.

To serve, remove side of pan, top with fruit topping of your choice and a dollop of whipped cream.

Black Forest Cheesecake

Rich and creamy, heavenly chocolately, melt in your mouth goodness! There are a few steps to get through but it is worth the effort…guaranteed!

Black Forest Cheesecake

1 cup Chocolate Cookie Crumbs
1/4 cup Butter, melted

2 pkgs 250g Philly Cream Cheese, softened
3/4 cup Sugar
2 Eggs
1/2 cup (100g bar of chocolate) Dark Chocolate, melted
1/3 cup Cream
2 Tablespoons Kirsch (Cherry Brandy)
1 can (425g) pitted Cherries, drained and reserving liquid

1 can (425g) pitted Cherries, reserve 8 – 10 whole cherries for garnish
Reserved liquid from first can of cherries
1 /3 cup Sugar
1 Tablespoon Cornstarch

2 cups Whipping Cream
1 Tablespoon Icing Sugar
1 teaspoon vanilla

Chocolate Curls/Shavings

Combine cookie crumbs and melted butter.
Press into an 8″ Springform pan.
Chill.

Preheat oven to 300F (150C)
In tall mixing bowl, beat cream cheese and sugar just until smooth.
Beat in eggs, one at a time.
On low speed, stir in the chocolate, cream and kirsch just until smooth. Do not over beat.
Stir in the first amount of drained cherries.

Pour into prepared crust and bake in 300F oven for 45 minutes.
Edges will be puffy and centre still a bit wiggly.

Turn oven off, allow cheesecake to cool in oven with the door ajar for about an hour.
Remove from oven and cool completely, then chill for two hours.

While cheesecake is chilling combine second can of cherries, reserved liquid from first can, and 1/3 cup sugar.
Bring to a boil.
In a small bowl, using a fork, stir together 2 tbsp of water and the cornstarch.
Add cornstarch paste to cherries and return to a boil; cook for a minute, stirring constantly.
Reduce heat and simmer until slightly thickened.
Remove from heat and cool.

In tall mixing bowl that has been chilled along with mixing beaters, whip the cream until slightly thickened.
Add icing sugar a lil at a time.
Add vanilla and whip cream to desired stiffness; do not over whip.

Building the Black Forest Cheesecake.
Load piping bag with whipped cream and pipe a border around the top edge of the cheesecake.
Fill center of Whipped Cream border with the chilled Cherry mixture.
Sprinkle the Cherry filling with chocolate shavings/curls.
Decorate with reserved cherries.

Blueberry Cheesecake

I used to be a huge fan of those no-bake Cheesecakes but then discovered this recipe. I wish I could give credit where credit is due  but the recipe I am posting here is recreated from crude notes over 4 bits of scrap paper! This procedure was a lil odd to me but the results were so amazing that I will blindly follow!  Thanks Anita for asking about Cheesecake as it made me dig through my recipe box! BTW, this is kind of like those lil Cheesecakes you get at Save On Foods, but yummier!

Blueberry Cheesecake

1 1/2 cup Nilla Cookie crumbs or Graham Wafer Crumbs (<- can’t get the latter in .au)
1/4 cup Sugar
1/3 cup Butter, melted

2 1/2 cups Blueberries
1/4 cup Water
1 Tablespoon Cornstarch
1 Tablespoon Lemon Juice

3 packages Philly Cream Cheese, slightly softened
1 cup Sugar
4 Eggs
2 Tablespoons Cornstarch
1/4 teaspoon Salt

Swirl in Blueberry Sauce

2 cups Sour Cream
2 Tablespoons Sugar
1 1/2 teaspoons Vanilla

1/2 cup reserved Blueberries
1/4 cup Sugar
1/4 cup Water
1 1/2 teaspoons Cornstarch

2 cups Whipping Cream
1 Tablespoon Icing Sugar
1 teaspoon Vanilla

Preheat oven to 325F.
Put together a 10″ Springform pan; set aside.
In medium mixing bowl combine crumbs, sugar and  melted butter.
Press into springform pan.

Bake in 325F oven for 9 minutes.
Remove from oven and cool.

Meanwhile, in medium saucepan over medium – high heat stir together blueberries, lemon juice and 1 tablespoon of the water.
Stir cornstarch into remaining water and keep handy.
Bring  blueberries to a boil, stirring constantly.
When berries are bubbling, stir in cornstarch/water mixture and continue cooking for another minute.
Remove from heat and allow to cool.

In large mixing bowl beat softened cream cheese just until no lumps can be seen; add sugar,  1/3 at a time, stirring to incorporate well.
Stir in eggs, one at a time.
Stir in cornstarch, salt and a bit of vanilla, if you like…I always do!
Pour cream cheese mixture over crust.
Top with blueberry mixture, gently swirl with a knife.

Swirled Blueberry Cheesecake to go back into the oven

Bake in 325F oven for an hour.

Bake in a low temperature oven

Remove from oven, cool on wire rack for 20 minutes.

Remove from oven, add sour cream topping

While Cheesecake is baking, combine sour cream, sugar and vanilla in a small mixing bowl.
Once cheesecake has cooled for 20 minutes, spread the sour cream mixture on top.
Return to oven and bake for another 10 minutes at 325F.

Topped with Sour Cream Topping and back into the oven

Turn the oven off, open the door a few inches and allow cheesecake to cool in the cooling oven for about 60 minutes.
Remove from oven, run a knife around the edge of the cheesecake and cool completely on wire rack.

After cooling cake in the oven for an hour, remove and run knife around the edge. Remove springform side.

Nope, you are not done yet! And you thought it was over!

In small saucepan combine sugar, water and cornstarch and bring to a boil.
Continue cooking until mixture has thickened.
Remove from heat, stir in blueberries.
Cool.
And last, but not least,
In large mixing bowl, whip cream until it starts to thicken a little.
Add the icing sugar, a teaspoon at a time and finally adding the vanilla.
Beat a little for soft peaks, a bit more for stiff peaks but do not overbeat!
Load whipped cream into a piping bag and pipe a border around the outer edge of the cheesecake.

To serve, cut into wedges, top with a bit of the blueberry mixture.

Serve with a dollop of fresh Whipped Cream

Alright, you have now really and truly earned yourself a piece of the Best Blueberry Cheesecake you will ever try!

Some Notes about making Cheesecake:

Cracking Cheesecake? Are you over beating the Cream Cheese?
*Bring cream cheese to room temp before beating by allowing to sit on countertop for 30 minutes or you can gently microwave in 10 second intervals until soft enough to easily beat.
*No peeking…well, you can look through the oven glass but def no opening oven door for at least the first 30 minutes of baking.
Most cheesecakes want to be baked for about an hour but I would recommend you start checking at 50 minutes.
*When done, the outer edges of cheesecake will be puffy and the center may still look a little jiggly; the cheesecake will continue cooking as it cools.
*Do allow cheesecake to cool in the oven once you have turned the oven off, leaving the door ajar.

Don’t despair if your cheesecake cracks! Easy to cover up with a bit of whipped cream!

Which brings to mind:
*When making whipped cream, chill CLEAN stainless steel or glass bowl and CLEAN beaters in the freezer for 10 – 15 minutes
– residual grease will hinder your efforts to get nice peaks in your whipped cream
*Store prepared Whipped Cream in CLEAN stainless steel or glass bowl, cover with plastic wrap.
* If using piping bag, it is essential that the bag is clean and free from any residual grease from icing

Enjoy!

Welcome to my Kitchen where the most important ingredient is Love.